|
||||||||||||||||
|
||||||||||||||||
| Home | Products |
Watch Video |
Pay Invoice |
Insurance | Shipping | FAQ | Testimonials |
Still Not Convinced? |
Instructions |
JB-3 Story |
Privacy | Returns |
Contact Us |
|
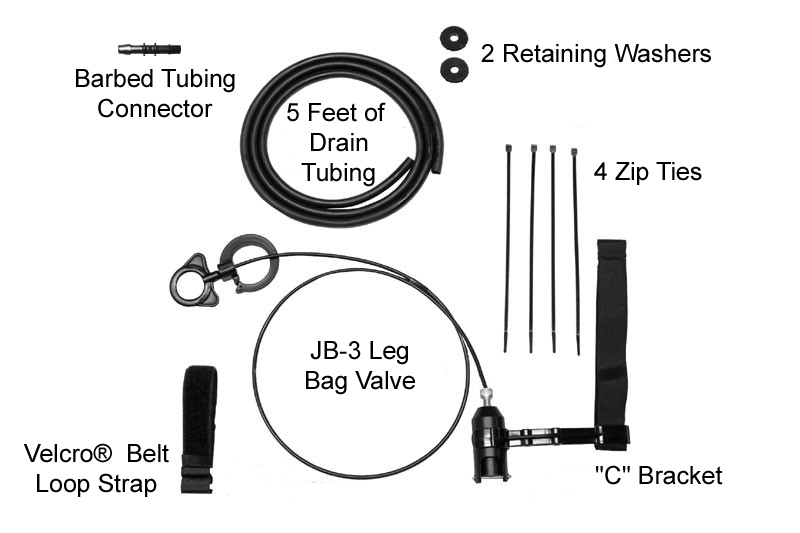
Kit Contents |
 |
||||||||
|
Figure 1 |
||||||||
 |
||||||||
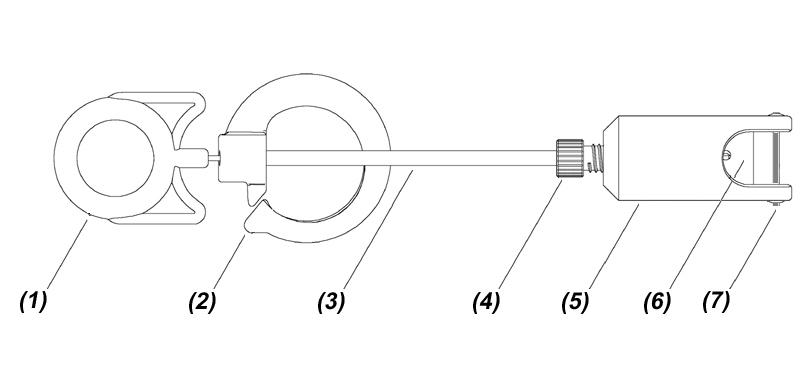
| 1. Finger Loop | 2. Belt Loop | 3. Cable | 4. Adjustment Screw | 5. Valve Body | 6. Plunger | 7. Clamping Bar | ||
Figure 2 |
||||||||
|
Warranty |
|
One (1) year Full Warranty: Coverage: The JB-3 Leg Bag Emptier is covered by a One (1) Year Manufacturer's Warranty. This warranty covers any failure of the JB-3 product due to manufacturing errors and/or defects. This warranty also covers any performance failure of the JB-3 product when used in accordance with the supplied instructions and Black Drain Tubing. This warranty does not cover damages or defects relating to misuse, abuse, negligence, normal wear and tear, alterations, exposure to the elements, acts of God, improper installation, storage or handling. Any consequential damages or losses directly or indirectly related to failure of the JB-3 product will NOT be covered. In no event shall our liability exceed the cost of the goods. Replacement Terms: We will, at our discretion, either repair the defect or replace the product upon receiving the failed item and determining that the failure falls within the coverage conditions expressed in this warranty. To receive in-warranty service, please contact the appropriate customer service listed on the back of this instruction manual. A proof of purchase such as an invoice or receipt will be necessary to determine the warranty period. This warranty is not transferable. |
|
Setup |
|
WARNING: The JB-3 Leg Bag Emptier is designed to work with the supplied Black Drain Tubing and is warranted for performance only with the supplied tubing. NOTE: This manual is also online at http://www.jb-3.com. Click on the "Instruction Manual" tab. Double-clicking on any of the pictures on the "Instruction Manual" web page will display a larger picture in most cases. |
|
1. Cut and Attach Drain Tube: |
|
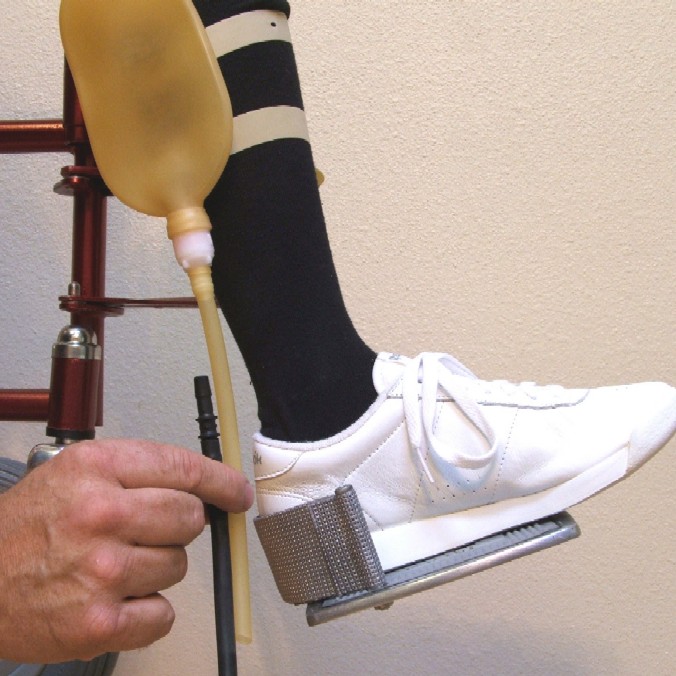 |
Take the Barbed Tubing Connector (with Black Drain Tubing attached) from the package and put it next to your current leg bag tubing to determine where you should cut your current tubing. Make sure that the Black Drain Tubing is long enough to extend past the foot rest. You will also want to cut your current leg bag tubing so there is enough to roll onto the Barbed Tubing Connector.
|
|
Figure 3 (click on the picture to make it larger) |
|
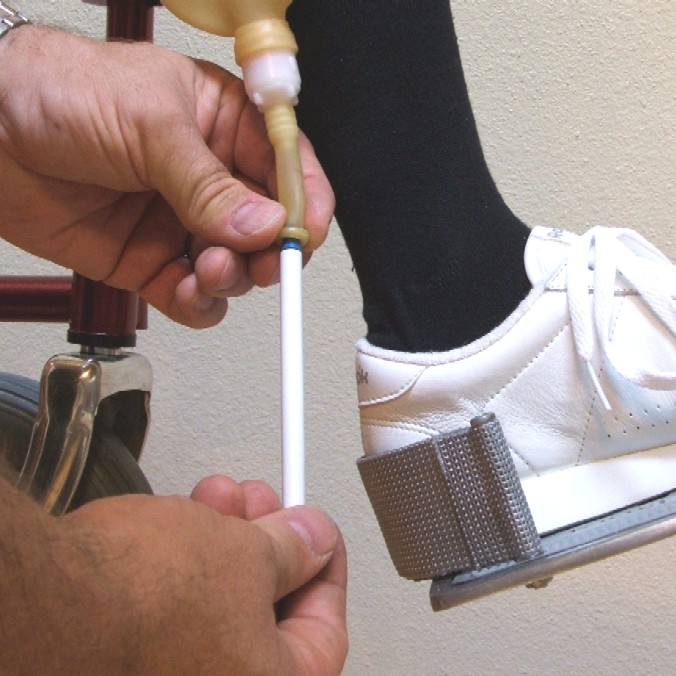 |
After cutting your current leg bag tubing to the correct length, attach the Barbed Tubing Connector with the Black Drain Tubing. An easy way to do this is by inserting a pen or pencil into your current leg bag tubing about 1 inch and rolling the tubing onto itself until the pen or pencil is no longer inside the tubing.
|
|
Figure 4 (click on the picture to make it larger) |
|
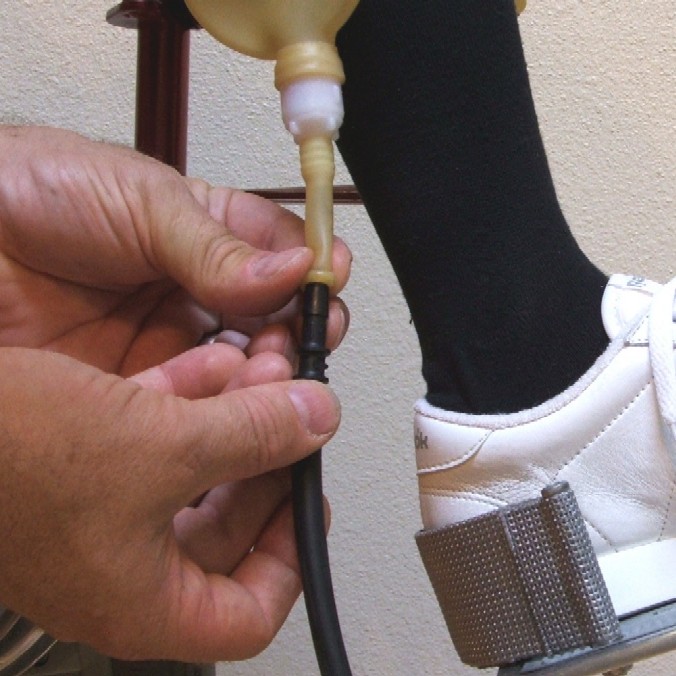 |
While holding the rolled-up tubing, place the Barbed Tubing Connector up to this rolled-up tubing and unroll it onto the Barbed Tubing Connector. NOTE: The Barbed Tubing Connector is not required. In some cases you may want to connect the Black Drain Tubing directly to the petcock valve of your leg bag.
|
|
Figure 5 (click on the picture to make it larger) |
|
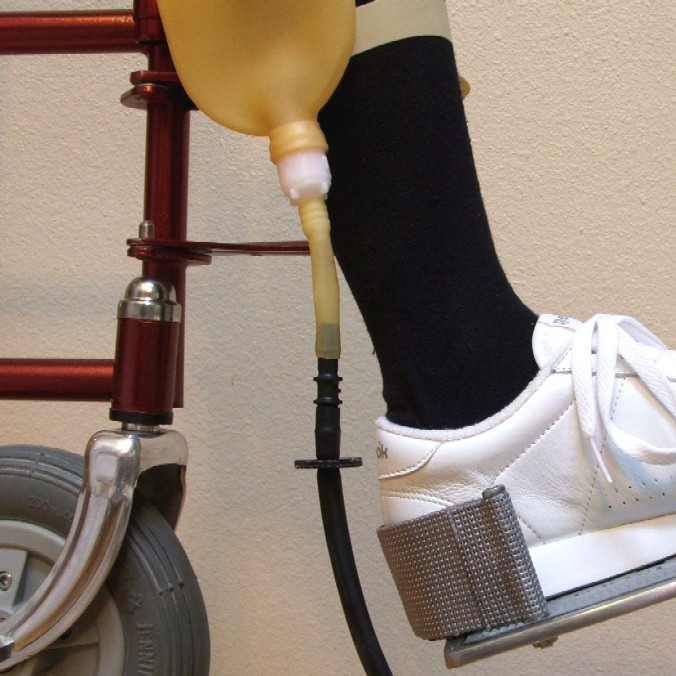 |
The drain tubing should look something like this. The first of two Rubber Retaining Washers should be put on now. Just put the Black Drain Tubing through the hole in the Rubber Retaining Washer and slide it up a few inches.
|
|
Figure 6 (click on the picture to make it larger) |
|
|
2. Insert Black Drain Tubing in Clamp Area |
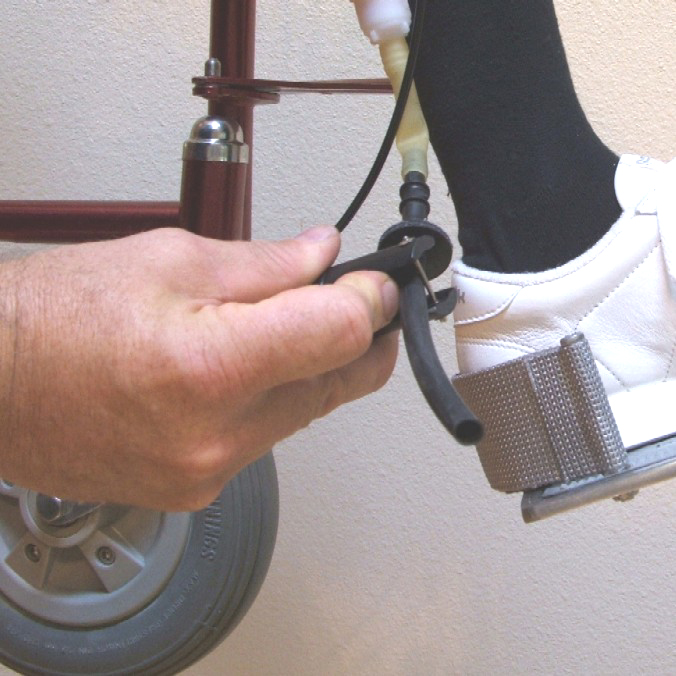 |
Press on the Plunger (Figure 2, Item 6) with your finger and insert the Black Drain Tubing between the Clamping Bar (Figure 2, Item 7) and the Plunger. Let the Plunger snap into place. Now is also a good time to see if the Plunger moves freely without sticking. If it does seem sticky, please see the "Troubleshooting" section (Page 13) to diagnose and correct the problem.
|
|
Figure 7 (click on the picture to make it larger) |
|
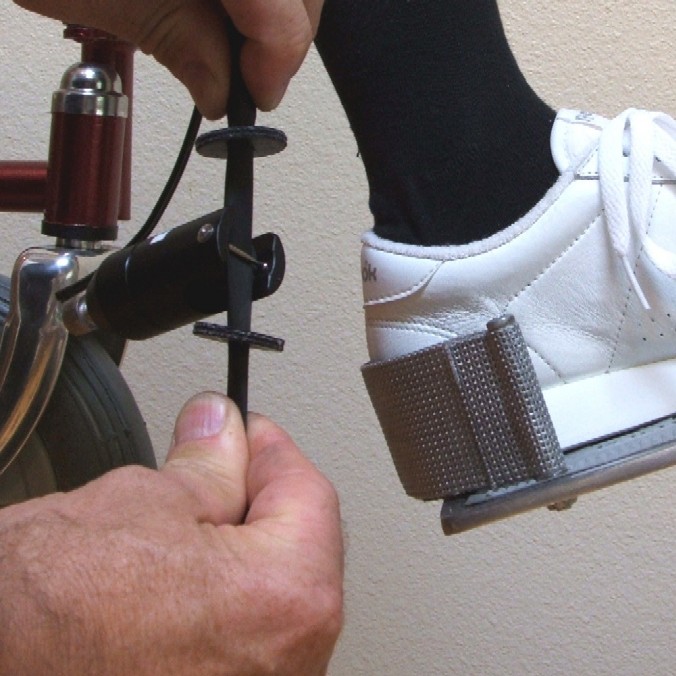 |
Slide on the second Rubber Retaining Washer. To remove crimping from inside the Rubber Retaining Washers and any folds in the clamping area, stretch the Black Drain Tubing using both hands. This procedure will ensure an easy reliable flow of urine.
|
|
Figure 8 (click on the picture to make it larger) |
|
3. Position the "C" Bracket |
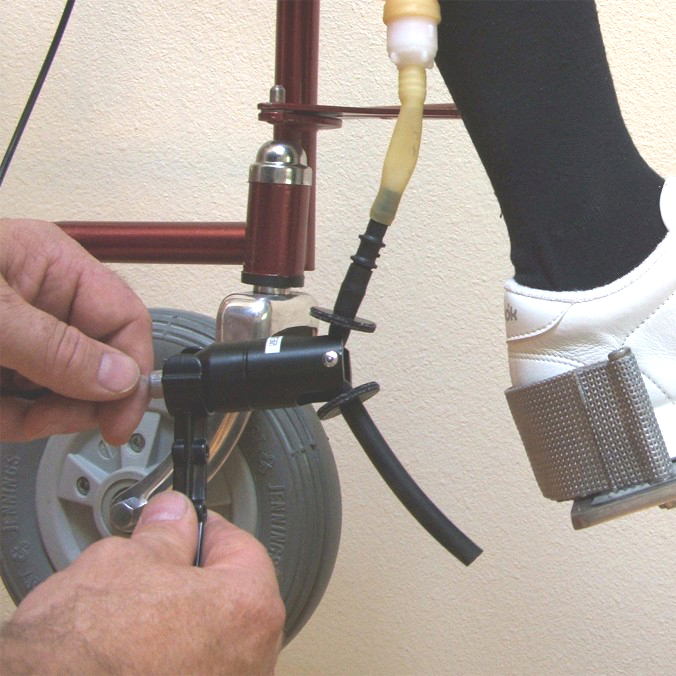 |
It is important when installing the "C" Bracket that you slide it from the tapered end of the Valve Body up to where it clicks into place on the groove of the Valve Body (Figure 2, Item 5). Removing the "C" Bracket should be just the reverse. Doing it this way reduces the stress on the plastic and helps prevent the "C" Bracket from breaking.
|
|
Figure 9 (click on the picture to make it larger) |
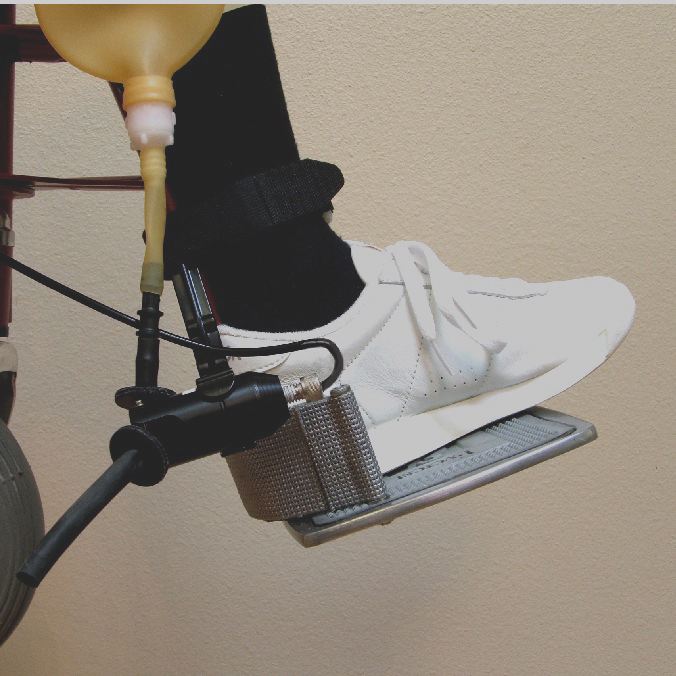 |
Make sure when you position the "C" Bracket that the Cable (Figure 2, Item 3) is not doubling back. This is an example of the cable doubling back on itself. Tight corners or loops cause resistance that can result in dripping and make activation much harder. Re-routing the Cable or turning the Valve Body around in the "C" Bracket should correct the problem.
|
|
Figure 10 (click on the picture to make it larger) |
|
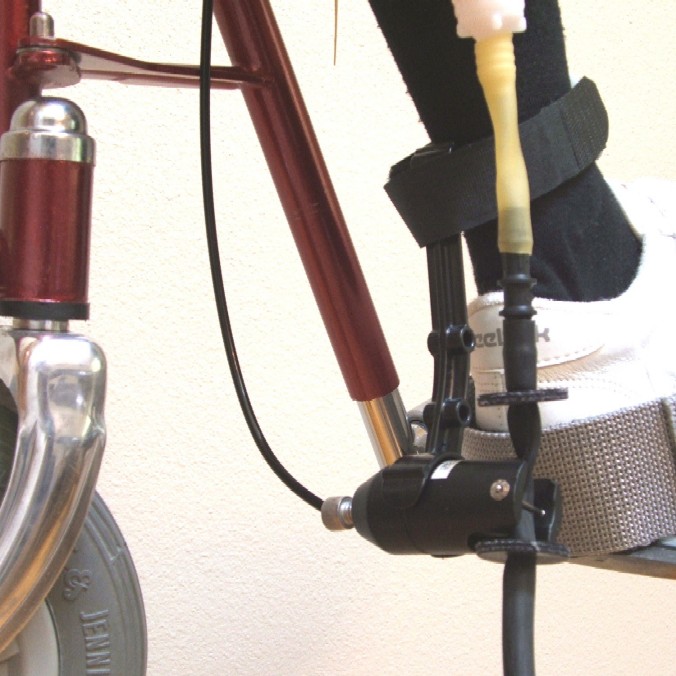 |
A checklist for a correctly-installed JB-3 Leg Bag Emptier: |
| 1. No tubing is kinked. 7. The tilting mechanism of the wheelchair doesn't pull or crush the cable. | |
| 2. Cable has no sharp bends. | |
| 3. Retaining Washers are installed. | |
| 4. Black Drain Tubing positioned to drain away from footrest. | |
| 5. The valve on the leg bag is open. | |
| 6. There is no dripping | |
|
Figure 11 (click on the picture to make it larger) |
|
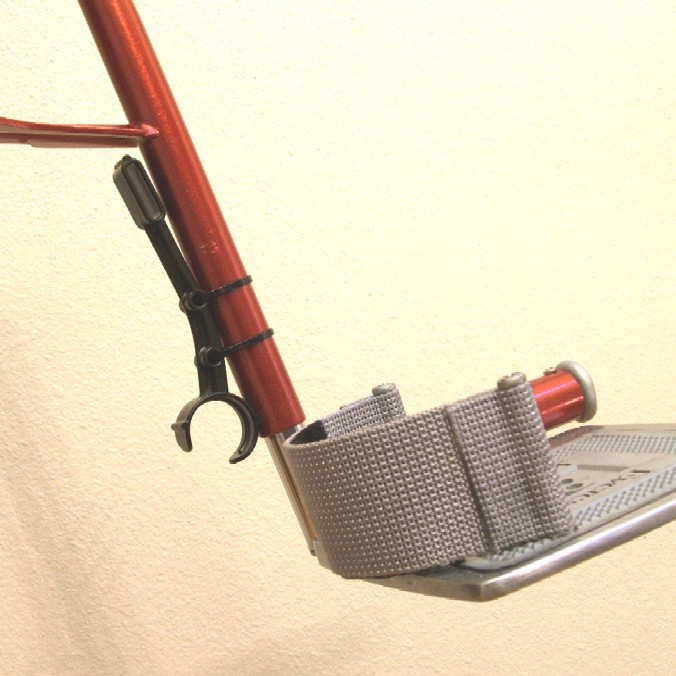 |
An alternate installation allows attaching the "C" Bracket to the foot-rest strut using the supplied Zip Ties. No damage is done to the wheelchair and the Zip Ties can be easily cut for removal. Some people prefer not to use the "C" Bracket at all and only use the Rubber Retaining Washers to hold the valve in place.
|
|
Figure 12 (click on the picture to make it larger) |
|
4. Attaching the Belt Loop |
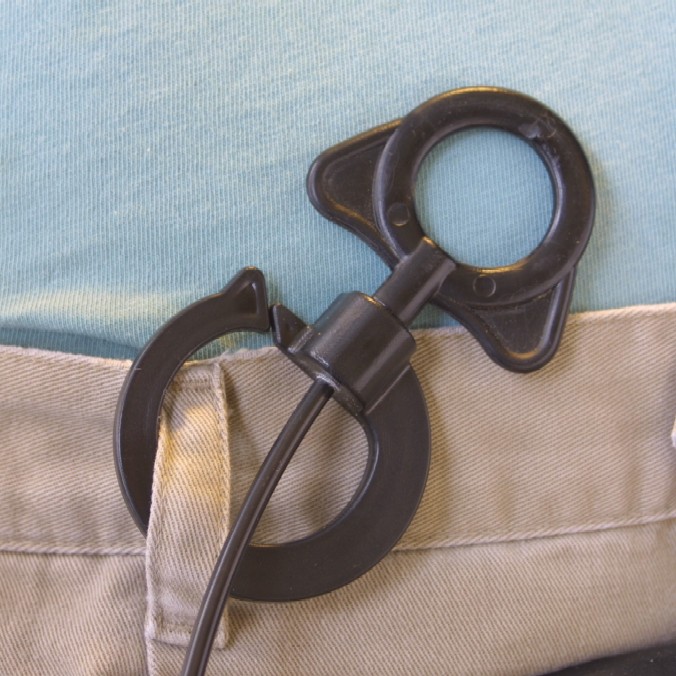 |
There are a number of ways in which the Belt Loop (Figure 2, Item 2) can be attached. The Belt Loop allows you to hook it to almost anything, including the loop on your pants. The Cable (Figure 2,Item 3) can run down either inside or outside the pants. Be very careful not to allow the Cable to be situated so that it may cause tissue irritation if worn inside the pants.
|
|
Figure 13 (click on the picture to make it larger) |
|
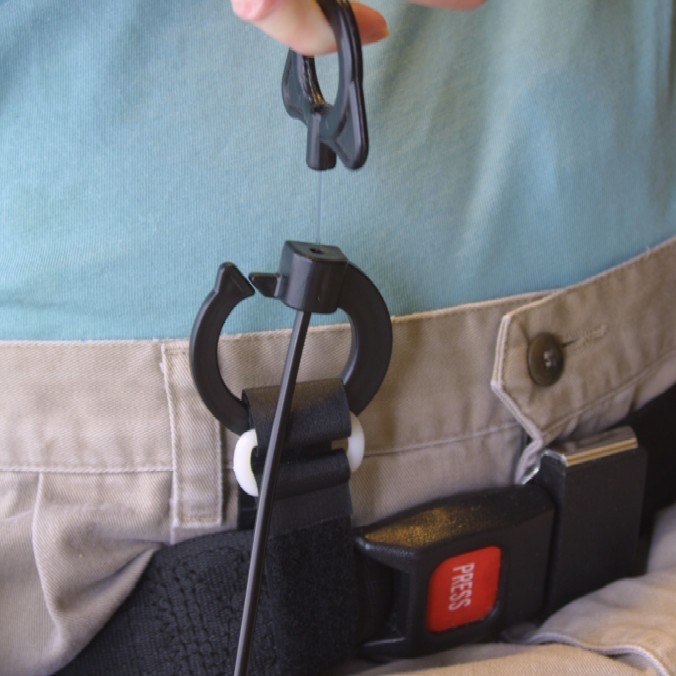 |
If you are not wearing clothing that has a belt or a belt loop, the Belt Loop (Figure 2, Item 2) can be attached to the wheelchair's safety belt. If the wheelchair safety belt is too thick or wide to be used , then try using the 12 inch Velcro(R) Strap around the safety belt as shown here.
|
|
Figure 14 (click on the picture to make it larger) |
|
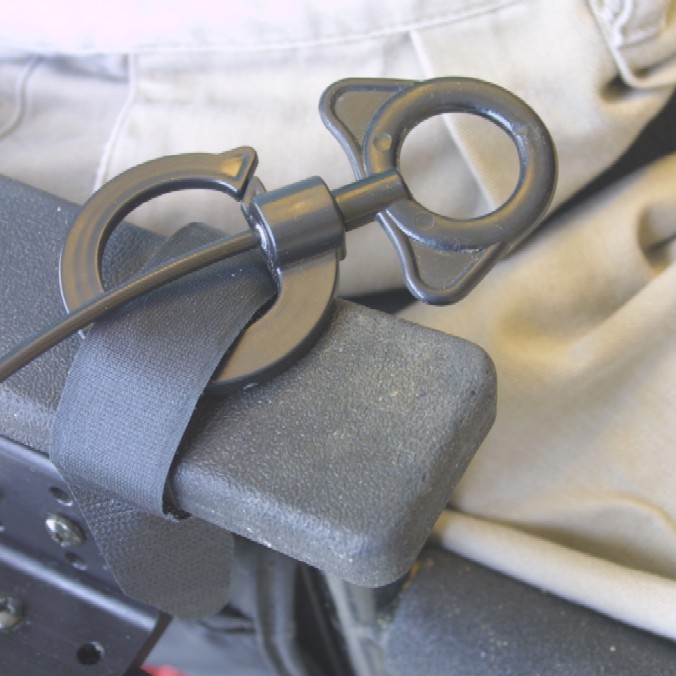 |
To attach the Belt Loop (Figure 2, Item 2) to the wheelchair, you can use the supplied Velcro(R) Strap around the arm of the wheelchair. If you would like the Belt Loop to be attached to something that is more than 1/4 inch thick, use the Velcro(R) Strap around that object, then attach the Belt Loop to the Velcro(R) Strap as shown here. A Zip Tie could also be used in this way.
|
|
Figure 15 (click on the picture to make it larger) |
|
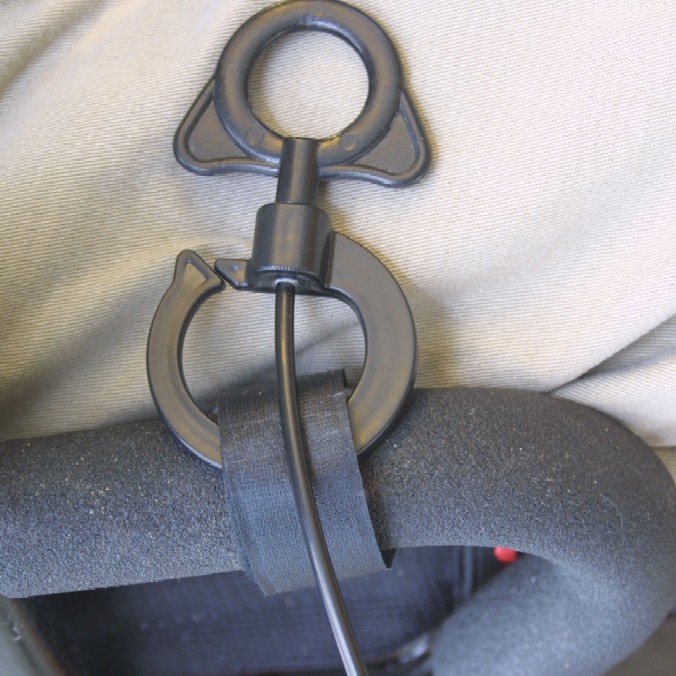 |
Some people prefer to attach the Belt Loop (Figure 2, Item 2) to the lower leg brace of the wheelchair. In this case a shorter Cable (Figure 2, Item 3) was ordered. If you think you would benefit from a shorter or longer Cable contact EclecTec Innovations LLC using the information on the back of this instruction manual.
|
|
Figure 16 (click on the picture to make it larger) |
|
5. Verifying a Correct Installation |
|
Position the Black Drain Tubing over an appropriate receptacle and pull on the Finger Loop (Figure 2, Item 1). The JB-3 Leg Bag Emptier is designed to drain a 750 ml. leg bag in under 30 seconds, with less than 3 lbs. of pulling force. Let a small amount of urine drain, then release the Finger Loop. Wait 30 seconds. If no urine drips, then the JB-3 Leg Bag Emptier is correctly installed. It is normal to have 1 drip of residual urine after you release the Finger Loop. Several drips within 30 seconds means there are adjustments that need to be made. Go to the "Troubleshooting" section (Page 13 ) to determine what to do next. It's best to try this testing procedure 2 to 3 times to make sure there are no problems when you first install the JB-3 Leg Bag Emptier. |
|
The following pages contain general information that will help keep your JB-3 Leg Bag Emptier in good working order for years of trouble free use.
|
|
Putting Clamping Force to Factory Setting |
|
NOTE: No adjustment of the clamping force should be necessary when you receive your JB-3 Leg Bag Emptier. The Adjustment Screw comes from the factory already set for optimal clamping force with the supplied Black Drain Tubing. The following information is most commonly used after the Adjustment Screw has been removed to clean the Valve Body of debris. To put the clamping force of the JB-3 Leg Bag Emptier in the approximate factory setting as shown in Figure 17, install the Adjustment Screw (Figure 2, Item 4), and screw it into the Valve Body (Figure 2 item 5) as far as it will go. Now, unscrew the Adjustment Screw 5 complete turns. Follow the instructions "Adjusting Clamping Force" (Page10 ) for further adjustments if they are necessary. |
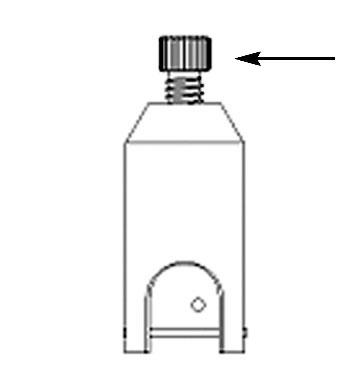 |
The JB-3 Leg Bag Emptier has been designed to have an adjustable clamping force so that it will reliably drain and retain urine in a leg bag with minimal activation strength required. Figure 17 represents how the Adjustment Screw looks when it is in the approximate factory setting, while Figure 18 represents how the Adjustment Screw looks when maximum clamping force is applied. Turn the Adjustment Screw (Figure 2, Item 4) clockwise to apply more clamping force. Turn the Adjustment Screw counter clockwise to reduce clamping force. |
|
Figure 17 |
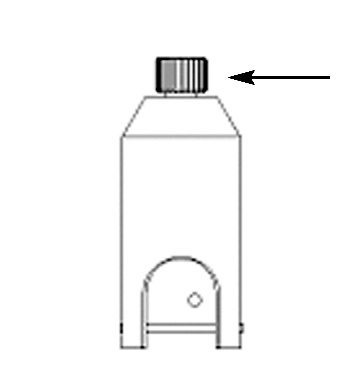 |
WARNING: Additional clamping force also puts additional stress on the Pull Ring (Figure 2, item 1), Belt Loop (Figure 2, Item 2) and Cable (Figure 2, item 3). Adjust in 1/2 turn increments and test for leaking. When making adjustments it is best to put a receptacle under the drain tube to catch any drippings. To help avoid excessive stress, it's recommended that the clamping force is not increased more than 2 complete turns past the factory setting. NOTE: If there is mechanical failure such that activation with the Finger Loop isn't possible, an attendant can press the plunger back with their finger to drain the leg bag. |
|
Figure 18 |
|
More Methods to Assist in Activation: |
|
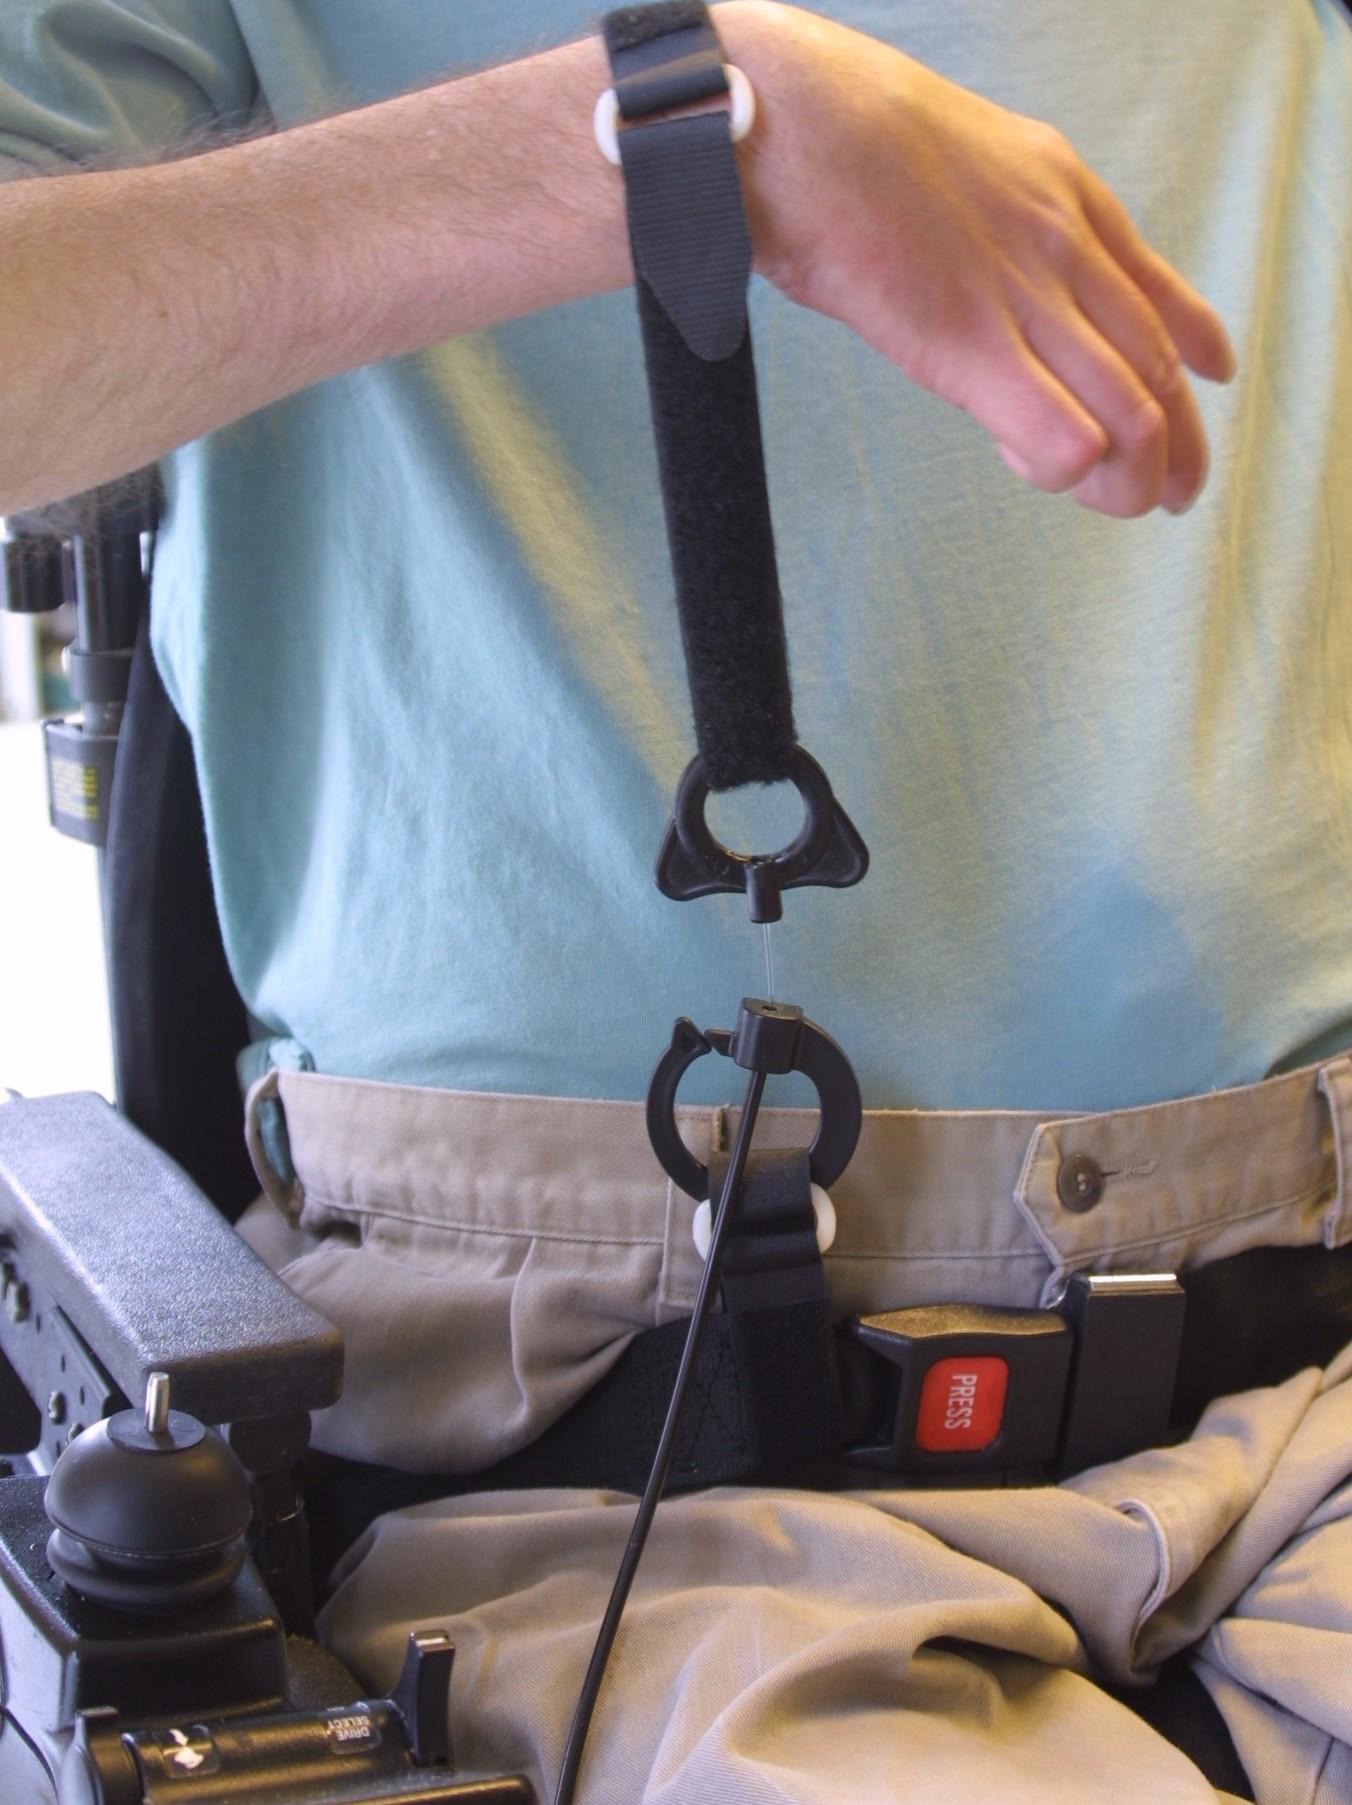
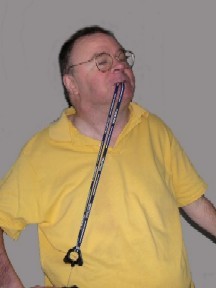
Attaching other grips to the Finger Loop allows many possibilities of activation. This person attached the "C" Bracket with the Zip Ties provided. This left the 18-inch Velcro(R) Strap to be used as an easy way to activate the JB-3 Leg Bag Emptier. |
|
 |
 |
|
Figure 19 |
Figure 20
|
|
Helpful tips |
|
||||||||||||||||
Urine takes a long time to drain- |
|
|